


What is Fire Fighting Hose Cabinet
forede Fire Hose Cabinet stores five core fire components: a durable cabinet (galvanized steel/304 stainless steel), 25–50m hose, rack, nozzle, and valve. It has a quick-access door and three installation types. Advantages: 50% longer hose life, fast deployment (under a minute), space-saving, user-friendly, easy maintenance. Ideal for commercial, industrial, public, and transport settings. Installation steps: prep location, mark positions, mount cabinet, install components, test. A vital tool for early fire response, ensuring components are protected and accessible.
General Description
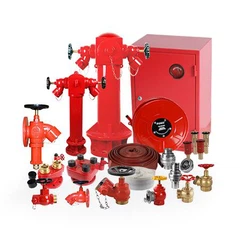
forede Fire Hose Cabinet is a purpose-built stationary storage system designed to house, organize, and protect five core components of basic fire suppression setups: a rigid outer cabinet, a fire hose, a hose rack, a nozzle, and a hose valve. Unlike generic storage containers that lack fire-specific design, it is engineered to maintain the functionality of these critical tools and ensure instant access, serving as a primary resource for addressing early-stage fires in various buildings.
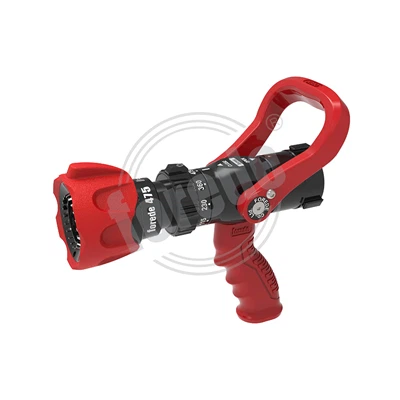
The outer cabinet is constructed from either 1.2mm thick galvanized steel with a rust-resistant epoxy finish (suitable for dry indoor areas like office corridors) or 304 stainless steel (ideal for damp spaces such as warehouse loading zones). Inside, a custom-shaped hose rack is fixed to one inner wall, designed to hold a 25–50m fire hose (1.5"–2.5" in diameter) in a neat, coiled manner-this prevents tangling and ensures smooth unrolling during emergencies. A small, dedicated slot on the opposite inner wall stores the nozzle, which can be a spray-type (for covering large fire areas) or a stream-type (for targeting small, concentrated blazes). Near the cabinet's bottom, a pre-drilled mounting area secures the hose valve, a key part that links the stored hose to the building's water supply, enabling quick water activation when fires occur.
The cabinet's door is optimized for rapid access: it can be a thin, shatterproof tempered glass panel (with a protective film to contain broken fragments) or a lightweight metal panel that opens with a single push. This intuitive design ensures even individuals without fire safety training can access the tools quickly. Offered in three installation types-surface-mounted (attached directly to wall surfaces), semi-recessed (partially embedded in walls to reduce protrusion), and fully recessed (completely fitted into wall cavities)-the cabinet adapts to different space limitations while keeping fire tools within easy reach.
Advantages
forede Fire Hose Cabinet provides five key benefits that make it superior to disorganized or non-specialized fire tool storage, all focused on its role as a dedicated home for the cabinet, hose, rack, nozzle, and valve.
maintains tool functionality and extends service life. The enclosed cabinet shields the hose from dust that clogs internal water paths, moisture that breaks down rubber, and accidental impacts that cause cracks. The hose rack keeps the hose coiled evenly, avoiding permanent kinks that weaken the material over time-real-world use shows hoses stored here last 50% longer than those left loose in utility closets. The nozzle, stored in its dedicated slot, stays free from debris that blocks spray holes, and the hose valve remains clean, ensuring smooth connection to the water supply without jams.
enables ultra-fast tool deployment during fires. In emergencies, every second matters, and the cabinet's organized layout eliminates delays. The hose is pre-coiled on the rack, so users can pull it out in one continuous motion without stopping to untangle. The nozzle is placed right next to the hose's end, allowing immediate attachment, and the hose valve is already fixed-no time is wasted searching for parts. From opening the cabinet door to having water flow through the nozzle, the entire process takes less than 60 seconds, much faster than gathering loose tools from multiple spots.
optimizes space use and reduces clutter. By combining the cabinet, hose, rack, nozzle, and valve into one unit, it eliminates the need for multiple storage areas. In narrow corridors, small offices, or busy industrial workspaces, this is invaluable: surface-mounted models use empty wall space, while recessed models blend into the environment without occupying valuable floor or walkway area. This keeps the building tidy and ensures fire tools don't become daily obstacles.
simplifies regular maintenance. The cabinet's open internal structure allows quick visual checks: users can easily inspect the hose for wear, the nozzle for blockages, and the valve for leaks without moving or disassembling parts. The smooth exterior-whether epoxy-coated steel or stainless steel-can be wiped clean with a damp cloth in seconds, removing dust or minor spills. This easy maintenance ensures the cabinet and its contents are always ready for use when fires happen.
How to Install a Fire Cabinet?
Installing forede Fire Hose Cabinet requires following systematic steps to ensure stability, functionality, and proper alignment with its core components (cabinet, hose, rack, nozzle, valve), while adapting to the chosen installation type (surface-mounted, semi-recessed, fully recessed).
Pre-Installation Preparation
First, confirm the installation location meets basic requirements: it should be near a building's water supply (to connect the hose valve), visible and accessible (no obstacles within 1m of the cabinet), and away from heat sources or flammable materials. Gather necessary tools: a drill, level, measuring tape, screws (matching the wall material-concrete anchors for brick/concrete walls, wood screws for drywall), and a wrench (for valve connection). Check the cabinet's components: ensure the outer cabinet is undamaged, the hose rack is securely attached, and the hose valve has no cracks.
Step 1: Mark Mounting Positions
Use a measuring tape to mark the cabinet's position on the wall. For surface-mounted models: measure the cabinet's height (typically 1.5–1.8m from the floor, ensuring easy reach) and width, then mark the drill holes using the cabinet's pre-drilled mounting points as a guide. For semi-recessed/fully recessed models: measure the cabinet's outer dimensions, then mark a cutout on the wall (using a level to ensure straight lines) that matches the cabinet's depth (semi-recessed: half the cabinet's depth; fully recessed: full depth). Use a stud finder to locate wall studs (for drywall) or mark concrete drill points (for brick/concrete walls) to ensure secure mounting.
Step 2: Prepare the Wall (for Recessed Models)
For semi-recessed/fully recessed installations: Use a drywall saw or concrete cutter to cut the marked area on the wall. Remove any debris (dust, concrete fragments) and check for hidden wires or pipes (use a wire detector to avoid damage). For concrete walls, drill holes for mounting brackets (included with the cabinet) and secure them with concrete anchors. For drywall, attach a wooden frame inside the cutout to provide support for the cabinet.
Step 3: Mount the Outer Cabinet
For surface-mounted models: Hold the cabinet against the wall, aligning it with the marked drill holes. Use a level to ensure the cabinet is straight (both horizontally and vertically). Drill holes into the wall through the cabinet's mounting points, then insert screws and tighten them with a screwdriver until the cabinet is firmly attached (no wobbling). For recessed models: Slide the cabinet into the wall cutout, aligning it with the mounting brackets or wooden frame. Secure the cabinet from the inside using screws (pre-drilled holes in the cabinet's edges) to the wall supports.
Step 4: Install Internal Components
First, attach the hose valve to the pre-drilled mounting area at the cabinet's bottom. Use a wrench to tighten the valve's connections (ensure it is aligned with the building's water supply pipe). Next, mount the hose rack (if not pre-installed) to the inner wall using the provided screws-ensure it is level so the hose coils evenly. Then, coil the fire hose around the rack: start from the end connected to the valve, wrapping it in even loops to avoid tangling. Finally, place the nozzle in its dedicated slot on the inner wall, ensuring it is easily reachable and aligned with the hose's free end (for quick attachment).
Step 5: Test and Final Checks
Turn on the building's water supply and check the hose valve for leaks-tighten connections if any drips are found. Pull the hose from the rack to ensure it unrolls smoothly, then re-coil it to confirm the rack holds it securely. Close the cabinet door and check that it opens easily (no sticking) and latches properly. Wipe down the cabinet's exterior to remove installation dust, and ensure all components are visible and accessible.
Application
Transportation hubs:
Transportation hubs also use its space-saving features. Airports install small surface-mounted cabinets in terminal corridors, near restrooms and food courts. These hold 30m hoses and spray nozzles, ready to address fires in seating areas or concession stands. Train stations and subway terminals mount cabinets near platform exits, with hoses connected to the station's water supply via built-in valves. This ensures station staff can quickly respond to fires in passenger areas or ticket booths, minimizing travel disruptions.
Public institutions
Public institutions rely on it for easy access. Schools and universities place semi-recessed cabinets in classroom wings and auditorium hallways, where they are easily visible to students and teachers. These hold 25–30m hoses and simple spray nozzles, suitable for small fires in classrooms (from science experiment materials) or cafeterias (from food preparation accidents). Hospitals, prioritizing patient safety and space efficiency, install compact cabinets near nurse stations on each patient floor. These contain 30m hoses with gentle spray nozzles (to avoid damaging sensitive medical equipment) and have the hose valve positioned for quick access by nurses or staff.
Industrial facilities
Industrial facilities gain great benefits from its durable design. Manufacturing plants, where machinery and raw materials pose fire risks, use 304 stainless steel cabinets mounted near production lines. These units hold 40–50m hoses-long enough to cover large work areas-and are equipped with heavy-duty nozzles that withstand harsh industrial conditions, such as oil or chemical exposure. Warehouses, especially those with loading docks exposed to rain or humidity, install weather-resistant surface-mounted cabinets outside near dock entrances. These store hoses connected to external water supplies via built-in valves, ensuring readiness for fires in delivery trucks or stored goods.
commercial buildings
commercial buildings, it is widely applied. Shopping malls, with large floor spaces and multiple stores, install surface-mounted cabinets at every corridor crossroads, about 30–40m apart. These cabinets hold 30–40m hoses-long enough to reach across multiple storefronts-and are fitted with spray nozzles, ideal for putting out small fires in merchandise displays or customer waiting areas. Office buildings, which value a clean look, often choose fully recessed cabinets in elevator lobbies or near stairwells. These units contain 25–30m hoses and stream nozzles, perfect for suppressing office fires caused by overheated computers, printers, or paper waste. Hotels, focusing on guest safety, mount compact surface-mounted cabinets (around 600×450×200mm) near guest room doors. These hold 25m hoses and easy-to-use spray nozzles, allowing guests or housekeepers to quickly handle small fires in rooms or hallways.